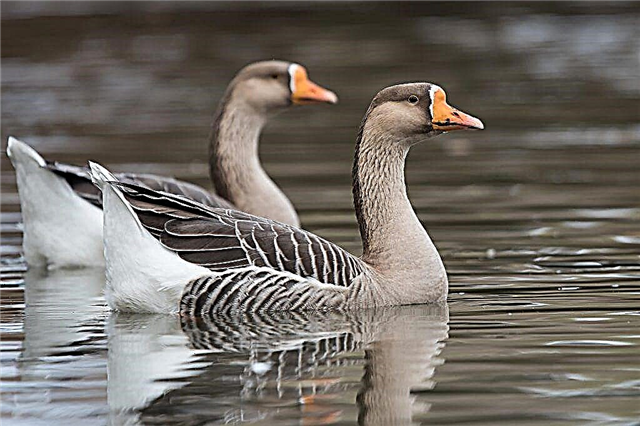
Young quail is kept in a brooder - a specially equipped crate or rack that replaces the brood hen. It can be purchased not only in the store, but also made with your own hands, observing a number of requirements for heating, lighting and equipment. If correctly made such a brooder, in the future it can be used to grow numerous generations of quail.

Why tinker with it?
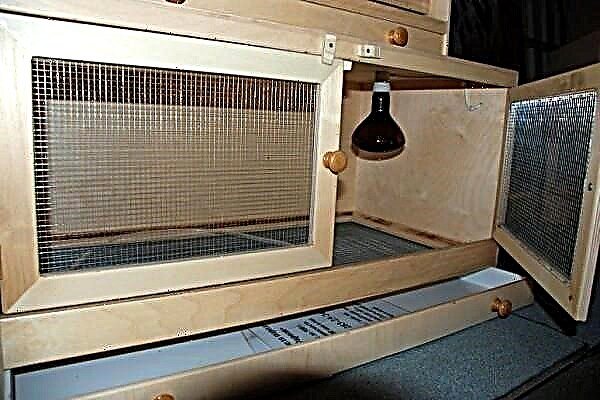
A brooder (from the English - hen) is a device in the form of a rack or a box with special internal equipment. It creates optimal conditions for the maintenance of chicks in the first days of their lives, so that they can gain strength and prepare for settlement in a common house.
Why is it so important to keep newborn chicks in a brooder? The fact is that in the eggshell there is a certain microclimate that disappears after the chicks hatch in the light. They can suffer from overheating and hypothermia. It is equally important to take care of the correct lighting, because for the quail both darkness and excessively bright light are equally harmful.
When kept in adverse conditions, the chicks are lagging behind in development and may even get rickets. To prevent such consequences, they are kept in a brooder, in which an optimal microclimate is created.
In addition, brooders have a second purpose and it consists in unloading the females. As a rule, newly hens pay much attention to their offspring and do not give eggs until the new season. Brooders replace the brood hen, thereby increasing the annual productivity of the females. They no longer spend energy on chicks, so their sock does not stop.
The advantages of a homemade design
The necessary design can be purchased at the store so as not to waste time on its manufacture. However, in order to save it, you can make it yourself. In addition, in stores it can be difficult to find a model that fits in its size and shape. So, a home-made design has a couple of advantages:
- Allows you to save on materials. In its manufacture, you can use improvised materials, for example, from old furniture. Nails and other fasteners are available in almost every household, and heating and lighting lamps are much cheaper to buy for a ready-made housing.
- Easily optimized for personal needs.. The brooder design can be adjusted to a specific number of goals. In addition, it will not be difficult to allocate additional space for feeders, drinking bowls, lamps and heaters.
Experienced breeders recommend equipping homemade brooders with feeders and drinking bowls for remote feeding of feed and water. This will minimize the constant human intervention, which scares the quail and leads to stress.
Requirements
The brooder will replace the brood hen, so it is extremely important to make it in compliance with a number of rules. Particular attention should be paid to such parameters as:
- Dimensions. The brooder should have such dimensions that fit harmoniously into the place that will be reserved for him. Of course, in this matter it is also necessary to take into account the number of chicks that are planned to be kept in the brooder. If this is about 100 goals, you can collect a brooder measuring 100x50x50 cm. After 2 weeks, the young growth will grow, so there will be critically little free space. Chicks will need to be moved to cells. If it is planned to breed more quail or no intention to transplant them into cages after 2 weeks, it is better to make a broader of large dimensions.
- Stability and reliability of the case. Some poultry farmers use cardboard boxes, plywood boxes or wicker baskets instead of a brooder. Although such designs are very economical, they are extremely unstable and do not allow creating the necessary environment for the quail. You need to choose materials that are resistant to damage, whose weight is not too light, otherwise active chicks can overturn or break the finished structure.
- Lighting mode. The development of the quail will depend on the duration and intensity of lighting, as well as on the spectrum of light exposure. During the first 2 weeks they need to provide long-term lighting. It should be borne in mind that in the case of a predominance of red rays, the maturity of the quail comes earlier. Of course, the precocity of the bird is only in the interests of the breeder.
- Ventilation. The air must be supplied in sufficient quantities for the breathing of the chicks, as well as the evaporation of moisture and odors. In this case, drafts and hypothermia should not be allowed.
- Heating system. The design can be equipped with infrared heating elements. They will maintain optimal temperature, but will not lead to burns of chicks. They can be conveniently mounted on the back of the structure. To prevent heat from escaping, there should be no drafts inside the brooder.
- Hygiene and cleanliness. In brooders equipped with drinking bowls and feeders, it is difficult to maintain cleanliness - scattered food, excess moisture and droppings together create unsanitary conditions, which is dangerous, because in such conditions the chicks can get sick and even die. So, in order to maintain cleanliness in the brooder, it is necessary to make feeders and drinking bowls specifically for it, and taking into account the number of livestock.

What materials to use?
It was previously noted that the brooder should be made of sustainable material, since this structure is designed for many years of operation. The most suitable options are:
- Board or plywood sheet. It should be noted that the thickness of the board should be 2.5 cm, and the sheet of plywood - 2-3 cm. Otherwise, the design will be unstable. In addition, the material must be treated with an antiseptic composition. If plywood is used, it is better to choose an environmentally friendly varnish that will not emit harmful toxic substances. The walls of the brooder can be made of fiberboard sheets, but their service life is shorter than that of plywood or boards.
- Polycarbonate. It is a durable and hygienic material that is easy to clean and disinfect. However, one significant drawback must be taken into account - it does not allow air to pass through, so it will be uncomfortable for the chicks to be inside the brooder, even in case of good ventilation.
- Galvanized wire mesh. Unlike a metal mesh, it will not rust quickly. Used as the front wall and bottom of the structure. The mesh size for the wall depends on how long the quail will be in the brooder. If 10-14 days, then the size should be 1x1 cm, and if 25-30 days - better than 2.5x1.5 cm. As a bottom, a 5x5 mm grid is used.
- Galvanized sheet or plastic. These are suitable materials for the litter bin, because they are easy to clean, corrosion free and do not accumulate specific odors. If you use a sheet of plywood, then the wood will quickly absorb odors, so the room will always carry bird droppings.
For the manufacture of a brooder, in no case can you use multilayer cardboard, since it is a fire hazardous material that is practically impossible to clean.
Step-by-step assembly instructions
You can assemble a brooder in different ways. We suggest that you familiarize yourself with the best options below.
Option number 1
Assembly is carried out in two stages:
- Build a container for chickens.
- Make a mesh bottom and litter bin.
The size of the finished brooder is 700x500x500 mm, and the internal height is 400 cm. It looks like this:

To assemble it, you need to prepare:
- plywood sheet with a thickness of 1 cm and a size of 152.5 x 152.5 cm;
- wooden beam with a section of 2x3 cm and a length of 12 cm;
- galvanized wire mesh with cells measuring 1x1 cm;
- PVC panel;
- self-tapping screws;
- 2 piano loops of 30 cm.
From the plywood sheet you will need to cut such elements:
- 2 side walls measuring 48x50 cm;
- back wall, bottom and ceiling - 3 pieces of size 70x50 cm;
- supports for the pallet and mesh bottom: 4 pieces 46x2 cm in size and 2 pieces 66x2 cm in size;
- for the front: 1 piece each measuring 64x5 cm (upper part) and 64x6 cm (lower part), two sidewalls measuring 40x5 cm;
- 2 doors measuring 40x44.5 cm;
- for the frame of the mesh bottom: 2 pieces each measuring 66x2 cm and 48x2 cm for one side, and 2 pieces each measuring 68x2 cm and 46x2 cm for the other side;
- for a pallet: a front part of 70x9.5 cm in size, 2 rails for a pallet frame of 65.5x2 cm and 47.5x2 cm for one side, and 2 pieces of 67.5x2 cm and 65.5x2 cm in size for the other side.
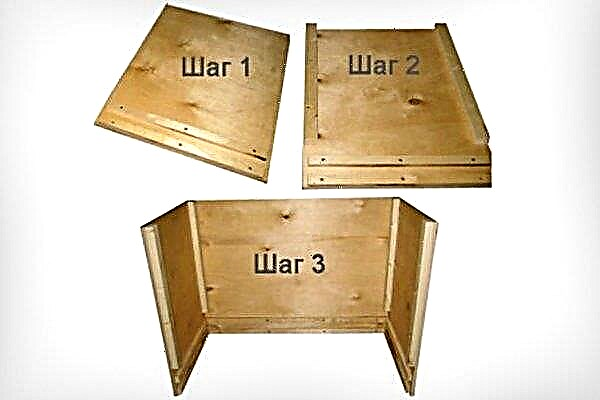
A step-by-step instruction for assembling the brooder is as follows:
- For the free circulation of the litter collection tray, make a slide system similar to that made in furniture tables when installing drawers. To do this, cut 4 plywood strips measuring 46x2 cm for the side walls and 2 strips measuring 96x2 cm for the end. Attach one of the strips to the underside of the wall under the edge, so that 1 cm does not reach the side walls. Place the second plank parallel to the first at a distance of 2.5-3 cm. It is necessary to strictly observe the distance between the planks on all walls so that they coincide during installation.
- Cut the beam into 4 equal parts of 40 cm to get brooder stiffeners. Attach them to 2 jokes on the side walls with the wide side using self-tapping screws. In this case, the upper edge of the wall and the bar should coincide.
- Connect 3 walls with self-tapping screws. If everything is done correctly, the grooves between the slats will coincide on all walls. Here is a clear illustration of all the actions up to this stage:
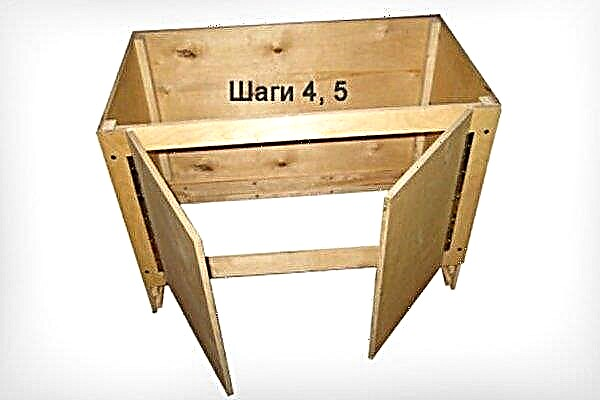
- Proceed to the assembly of the front part, from previously prepared workers making a frame. In this case, the side parts should lie on the lower and upper parts with a 2 cm approach. Piano loops should be attached to the front side of the sides.
- Cut out the doors measuring 40x44.5 cm and attach to the piano hinges. If you plan to make doors with a grid, for its installation you will need plywood 5 mm thick and a grid with a cell 5x5 cm or 7x7 cm in size of the door. Cut 2 slats per one door: 40x3 cm, 38.5x3 cm, 44.5x3 cm, 34x3. Collect as a net bottom in the next step (step No. 6). Hang the mounted doors on the piano hinges, connect the front part to the main body. If everything is done correctly, the doors will freely open and close, and the design itself will remain flat. To complete this stage, it remains to attach the ceiling and plywood bottom.
- To make a mesh bottom frame, prepare a mesh with a mesh of 1x1 cm and a size of 48x98 cm, as well as use the previously cut 4 planks. Mount the bottom according to the “sandwich” principle: insert the grid between the strips and fix it with self-tapping screws. Ideally, the mesh bottom will lie on the top of the pallet slide. So that the quail does not fall on the mesh bottom, you should temporarily make the bottom of the 5x5 mesh.
- To collect the litter bin, adhering to the same principle as in the manufacture of the mesh bottom, however, instead of the mesh, use a sheet of plastic (for example, PVC) or a sheet of galvanized metal. From the outside, attach a plywood strip to the pallet, which will close the inlet bottom and prevent dropping of droppings.


Quail, unlike other chickens, are not very shy, so they do not scatter when the brooder door is opened and may even try to jump out. So that they do not have a chance, a bar about 10 cm high should be attached from the floor to the bottom of the door.
Option number 2
The brooder can be assembled in the following sizes:
- length - 1 m;
- width - 0.5 m;
- height - 0.5 m;
- internal height - 0.45 m.

The assembly principle remains the same as in the previous instruction. So, so as not to be repeated, we offer a brief memo with detailed photographs:
- Saw blanks from plywood.
- Assemble the body of the structure using self-tapping screws.
- Close the cut-out doors from plywood with a net and fasten to the brooder with the help of hinges and stops.
- Tighten and secure the net for the main bottom.
- Make a frame with a mesh for a removable bottom.
- Attach the bottom to the brooder pan.
The following video demonstrates step-by-step the process of assembling a brooder from improvised materials:
Installation of heating and lighting
Having collected the brooder box, you need to proceed with the installation of lighting and heating. To do this, you need to choose an infrared lamp or film elements of the heated floor. We consider each option separately.
Infrared lamp
If the farm is small and only one brooder is required to keep the chicks, then to create the necessary conditions in it, it is enough to mount infrared lamps with a temperature regulator. Thanks to the power lighting regulator (dimmer), it will be possible to simultaneously control light and heat. As a rule, the maximum power of such lamps is 500 watts.
The installation of a heating system in this case involves the combination of infrared lamps, which are necessary for a specific livestock, and a thermostat in one circuit. When calculating the required number of lamps and their height above the floor, it must be assumed that the temperature in the brooder should be 36 ° C for the first few days. The simplest electrical design looks like this:
When the brooder is heated with an infrared lamp with a power of 250-300 watts per day, about 7 kW of electricity will be consumed. If a battery of 9 brooders is heated, up to 63 kW will be consumed daily, and about 2,000 kW per month. So, you have to pretty much fork out, which will significantly affect the cost. To avoid this, it is more advisable to use a heated floor system for heating.
Film elements of a heat-insulated floor
During mass cultivation, quail (from 500 goals and more) will need to equip a whole battery of brooders in the amount of 9 pieces. To save on electricity more than 3 times, you need to use heating elements for a warm floor. In this case, the lamp will only be used as a light source in the compartment of one brooder.
Film thermal mats, or rather their individual elements, are mounted on the rear wall of the brooder and connected by a manual temperature controller, creating an electrical circuit.
To heat the brooder, it can be equipped with an infrared film. You can learn more about it in the video below:
Creating a microclimate
In a home-made brooder, it is necessary to create a number of conditions for the quail to feel comfortable and actively develop. What parameters to convince special attention, see the table:
Parameter | Implementation |
| Temperature | In the first days after the transfer of chickens from the incubator, it is necessary to maintain a temperature of 36 ° C. Further, it can be reduced to 30 ° C. To control the temperature, you should hang a thermometer on one of the walls, so that its indicator can be seen without opening the doors. In addition, it is necessary to prevent direct sunlight from entering the thermometer, as well as its contact with the heating element. |
| Lighting | During the first week, lighting should have been around the clock. From day 8, daylight hours can be reduced by 3 hours per week. Its optimal duration is up to 12 hours for meat breeds and up to 8 hours for egg. The intensity of lighting on the first day is 20-25 lux, and from 2 to 21 days - 5-8 lux. It is advisable to place the light bulb behind the grate so that it does not come into contact with the chicks. |
| Ventilation | Near the brooder, any drafts are required to be eliminated, and ventilation is best provided by mesh doors. If dusty clouds appear inside the box, as well as odors of hydrogen sulfide or ammonia, then the air circulation is insufficient. |
| Humidity | In the early days, it should be 60-70%, and in the future, its level should be reduced to 50-60%. The humidity indicator must be measured with a special device several times a day.To simplify their life, a poultry breeder can install a complex of thermometer and hygrometer in the brooder. |
| Feeder | It is better to install automatic or bunker-type feeders. To the inventory of the second type, you can independently conduct a screw from the corrugation tube to facilitate filling the tank with food without opening the doors of the brooder. If you install a metal mesh on top of the feeder, the chicks through it will be able to eat food, without scattering it. However, it is extremely important to prevent sharp edges and torn cells, otherwise the quail can suffer. |
| Drinking bowl | Do not use saucers or troughs, as the water will often have to be changed, causing irritation and fright of birds. In addition, water is abundantly splashed from such drinking bowls, creating dirt, coupled with droppings and lint. So, it is better to use nipple or vacuum drinkers. |
In order for the quail to grow strong and viable, they must be kept in a brooder in the first days of life. It can be made with your own hands, using ready-made schemes and instructions. In this case, a number of requirements must be taken into account, otherwise a home-made construction will be unsuitable for keeping birds.